Before you start coding ...
You might want to have a quick look at the PowerPoint presentation before proceeding.
The buffered server API is probably the easiest to use to generate functional TINE servers. As a server programmer you have to deal with a miminum of API calls in order to export your data or accept commands.
For 'READ' data, you simply 'push' the data associated with a particular property and device when it has changed.
'WRITE' commands, you will register a notification handler that will respond when a client is trying to 'WRITE' data or otherwise send a command. We'll start by using this interface, since it will exercise most of the server configuration possibilites via the commas-separated-value (.csv) configuration files, or via the fec.xml configuration file, if that is preferred.
This is called a "buffered" server as the caller's input and output buffers are managed for you. This makes life easy, but removes a lot of flexibility (but also sources of error) from you.
Fully coded servers can continue to use the same configuration files to initialize the server. We shall progress to these later.
FEC configuration files
Determine where your test FEC's configuration files will be. Check the environment variable FEC_HOME. If not set (this is also okay) then the working directory will be used. However, if set the configuration files must be found where this environment variable points.
The suggestion, however is to use FEC_HOME=c:\tine\server\ in windows and ignore it in Linux.
Tine servers can in general run without any configuration files. In this case, however, all startup information must be provided via using the registration API calls. Although this is also possible with the buffered server, it is generally much, much easier to make use of startup configuration files. These can for the most part be generated for you by using the FEC and Server setup wizards.
As a bare minimum, you will need two configuration files to get your buffered server to run properly. These are
- fecid.csv
which provides information pertaining to the Front End Controller itself, the most important of which are its name and its port; and
- exports.csv
which provides information pertaining to the device servers which run on this FEC, such as which equipment modules and which properties are supported.
An example fecid.csv file might be:
An example exports.csv file might be:
These are just example files. You can make them by hand, but we'll be using the FEC wizard and Server wizard to generate them for us.
The tine csv parser will treat the first non-comment line as a header and look for the column locations in the header. The position of a column in the header is unimportant, but if it is required it must be there! Some columns are optional, and it ommitted, a default action will be taken. When using a spread-sheet such as Excel to examine or edit a csv file, the columns will line up visually very well and it is easier to see what belongs to what.
Other configuration files which we will be using as we go along include (but are not limited to):
- devices.csv
which provides a device list to the designated equipment module. This has the effect of assigning names to numbers.
- history.csv
which provides a list of properties which should be accessed by the local history subsystem.
- almwatch.csv
which provides a list of properties which should be accessed by the local alarm subsystem.
- users.csv
which provides a list of users who have WRITE access to those properties which change settings.
- ipnets.csv
which provides a list of subnets or individual ip addresses which have WRITE access to those properties which change settings.
All of these files should be found in the FEC_HOME area if they are to be read by the tine server. In particular, they should preferrably be found in a subdirectory in the FEC_HOME area with the same name as the associated 'local' equipment module name. In the example 'exports.csv' file above, for instance, this would be a sub-directory named 'SINSIM'. The server initialization would know to look at this location based on the buffered server API call which attaches to the configuration database (in 'C' this corresponds to 'AttachServer'), as long as the designated local equipment name is passed. If FEC_HOME is not set, the working directory is treated as 'FEC HOME'. If the corresponding subdirectory is not found, then configuration files are looked for directly in the FEC_HOME area.
- Note
- : The FEC setup wizard does nothing other than manage the fecid.csv file. It will edit and maintain this file directly in the FEC_HOME area. The Server setup wizard however will not only manage the exports.csv file (and history.csv, almwatch, devices.csv files), but will also generate code if you tell it to (we'll get to this later). In other words the Server wizard will manage the behavior of your server (to some extent anyway) and will put all of its files (code and the .csv files) in the directory you give as your working directory. You can set this working directory to be the same as your FEC_HOME area and everything will be there. This may or may not be a good idea. It is probably a better idea to keep a project directory and copy the .csv files resulting from any changes into the FEC_HOME area when you are satisfied will them.
- : If it is preferred to use 'fec.xml' as the server configuration, then there should be only a single file called 'fec.xml' in the FEC_HOME area (in this case all 'eggs' are in the same 'basket').
A Name for your server
Decide on the names of your FEC and your device server. If there's only going to be one device server attached to the FEC then they can be the same name. You can also use the computer host name (maybe appended with a ".<port offset>" such as "zitschl04e.0" as your fec name. And let's use the context "WORKSHOP" instead of the default "TEST".
Everyone will be able to see and browse for your device server name so choose a good one! For the sake of this example we'll pretend you chose "Station1" (we can't all choose this name, because the ENS will prevent more than one server from using an export name at a time).
- Note
- : The Equipment Module "Local Name" for historical reasons is limited to 6 characters (think of that old 8.3 file system on MSDOS and 16-bit windows). The other names can have up to 16 characters. A property name can be up to 32 characters, but it is also suggested to stick to 16 characters or less. The server wizard will choose a suitable local name for you. The suggestion is to use it. This name is not visible at the control system level and does not need to be system-wide unique. It only needs to be locally (i.e. within the server process) unique.
fecid.csv
Use the Fec Setup Wizard to make a fecid.csv file.
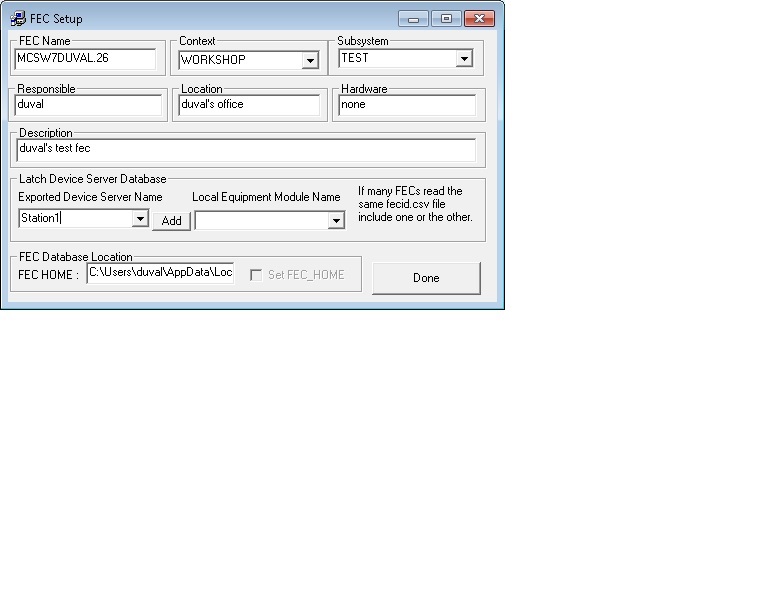
- Note
- The FEC wizard has combo boxes for the "Exported Device Server Name", and/or the "Local Equipment Module Name", which is actually more of relevance for the Server wizard and buffered server API than the FEC wizard. So why is it there? It turns out, you can leave it blank! The wizard will automatically create an optional column "EXPORT_NAME" in the fecid.csv if this item has an input. And this will allow multiple servers to use the same fecid.csv file. The problem is that if more than one server reads the same fecid.csv file it has to know which FECNAME belongs to it. It does this by trying to find a match in its exported device server name and an entry in fecid.csv file. If this item is absent, or the column is missing, the the first FEC name in the list is used. In the UNIX (i.e. non-Windows) world this is actually the usual strategy. There is no "Export_name" column in fecid.csv and fecid.csv contains only one line. This works if there is no FEC_HOME environment and the working directory is used, or if FEC_HOME is set individually for each server. In the windows world, FEC_HOME is usally set for the machine and all running servers read the same fecid.csv file. What this means though, is that the same Export Name is kept in two different configuration database files, which is a potential source of startup errors. This kind of error is usually fairly easy to find, however.
- The Unix world is currently at a disadvantage here. There is a tcl script which can generate the fecid.csv file for you, but you are probably better off generating it by hand.
exports.csv
Use the Server Setup Wizard to make an exports.csv file. Under Linux, try typing "TServerWizard" and if you're lucky the script will run.
Set the Export Name to the one you used in the FEC setup wizard. In our example this was 'Station1' Set the number of devices to 10 (the default was 1). The wizard will offer "STAEQM" as a local equipment module name.
As Properties, let's add our old favorite "Sine" as a property which can return 1024 float values with a range from -100 to 100 (choose your favorite units - how about 'V' for voltage?). As this is an array, there is an associated array 'type' (or at least there should be!). A Sine represents a 'waveform' kind of array (i.e. a 'spectrum' or 'trace'), where a particular waveform spectrum is associated with a specific device. Choose array type 'SPECTRUM'. Don't worry about anything from the 'History Panel' or 'Alarm Panel'.
- Note
- In the Server wizard, the format type "Single" is a "float" (a la VB and LabView).
Also add a property "Amplitude" which returns 10 float values between 0 and 100 (same units), i.e. 1 value for each device. This will be a 'multi-channel array', where each element in the array refers to the current value for a specific device, so choose array type 'CHANNEL'. This will also be a 'settable' property, so change the access to 'READ|WRITE'. and change the data Input to 1 float value.
Everybody does 'sine curves' as an example waveform, so lets put in a Guassian, just for fun. Add a property "Gaussian" which returns 1024 float values between 0 and 100 (same units). Also a 'SPECTRUM' array type and change the 'access' back to 'READ' and the Data input back to 0 maximum data size and Data Format back to NULL.
Finally add a property "Status" which returns 10 integer values (no units) with a range from 0 to 255.
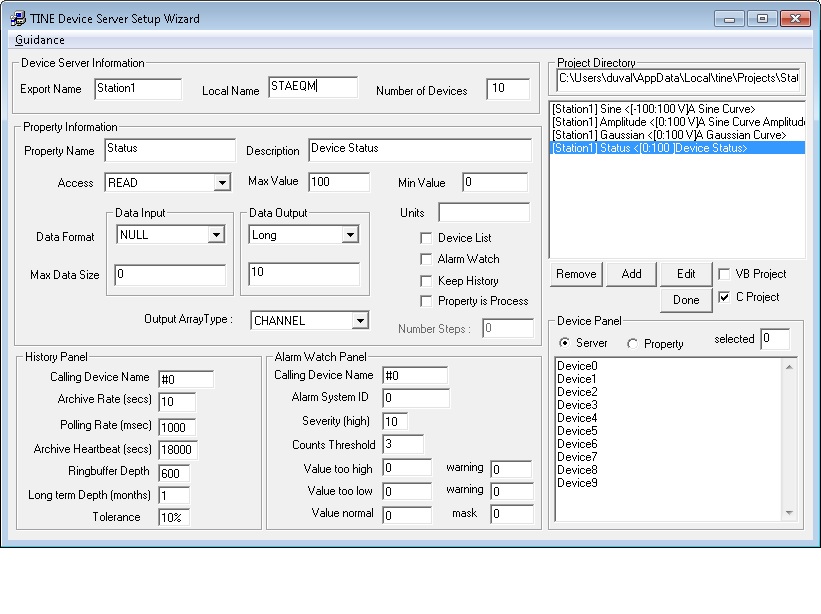
The Above example has used the exported device server name "Station1". Make sure your case will has a 'unique'name (There can be only 1 server called 'Station1' in context 'WORKSHOP').
Click "Done" on the wizard. It should produce an exports.csv file in the working directory indicated in the upper right hand corner (this will be on the TINE_ROOT location on the local disk). It will also place the relevant .csv files in the canonical subdirectory corresponding to the local equipment module name (as long as you answered 'yes' to the dialog query).
Find your platform
Copy this file into your FEC_HOME directory. We're now ready to actually start doing something. But what we do will depend on what platform you have chosen for your buffered server.
It is strongly recommended to first go through the exercises for the 'C' buffered server. This will illustrate 'what is really happening' is the most transparent way. Platforms such as LabView, .NET, MatLab, etc. are all essentially wrapping the calls used in the 'C' example anyway. Java is an exception here, as the TINE java libraries are written in native java.
C Programmers will want to go here.
VB.NET Programmers (start thinking of modernizing your act) will want to go here.
VB 6 Programmers (start thinking of modernizing your act) will want to go here.
LabView Programmers will want to go here.
Java Programmers will want to go here.
Proceed to the Standard Server
Take your time going through all of the steps highlighted for your platform. When you have finished you should procede to the Standard Server